

A free Windows app that turns the best community restore procedure into three things a junior DBA can do under pressure: restore a full chain, stop at an exact time, and keep a copy in sync with log shipping.
It is 09:44. A junior developer is cleaning up test data and runs a DROP TABLE. It was not the test database. A minute later the first colleague shouts that the order screen is broken.
The developer is white in the face. The senior DBA is on holiday. So it lands on the junior DBA: get the table back, and do not make it worse.
The tool most of us reach for is sp_DatabaseRestore from Brent Ozar’s First Responder Kit. It is excellent: it reads a folder of backups, works out the chain, and runs the restore for you. It is also a procedure with dozens of parameters, and nobody is calm while reading the help text with a developer standing behind them.
So I built SQLRestoreSOS. It does not replace sp_DatabaseRestore. It sits on top of it, shows you the exact call before anything runs, and lets you pick the things that matter with a mouse.
Why sp_DatabaseRestore is hard for a junior
None of this is the procedure’s fault. It is just a lot to hold in your head at once.
- The point in time is a string.
@StopAtwantsyyyyMMddHHmmssas text. Get one digit wrong and you restore to the wrong moment, or get an error. @ContinueLogsdoes not mean what it sounds like. It does not mean “also apply the logs”. Logs are applied whenever a log folder is given. It means “skip the full, the database is already restoring”.- The “what happens to the existing database” switch is a number.
@ExistingDBAction0, 1, 2 or 3. Three of the four values are destructive. - The server reads the backups, not you. The SQL Server service account needs access to the share. Your own permissions are irrelevant, which is not obvious when the files are right there in Explorer.
- A STOPAT earlier than the full backup finished fails. You find out only when the restore errors out half-way, and the target database is left in RESTORING.
What SQLRestoreSOS is
A dark-mode Windows desktop app. You connect to a SQL Server instance, pick a database, point it at your backup share and choose a point in time on a timeline. It then either shows you the T-SQL to copy and paste, or runs the restore itself and streams the output into a log.
Under the hood it generates a plain EXEC [dbo].[sp_DatabaseRestore] ... call. You can read it, copy it, and run it in SSMS if you prefer. The app never hides what it is going to do.
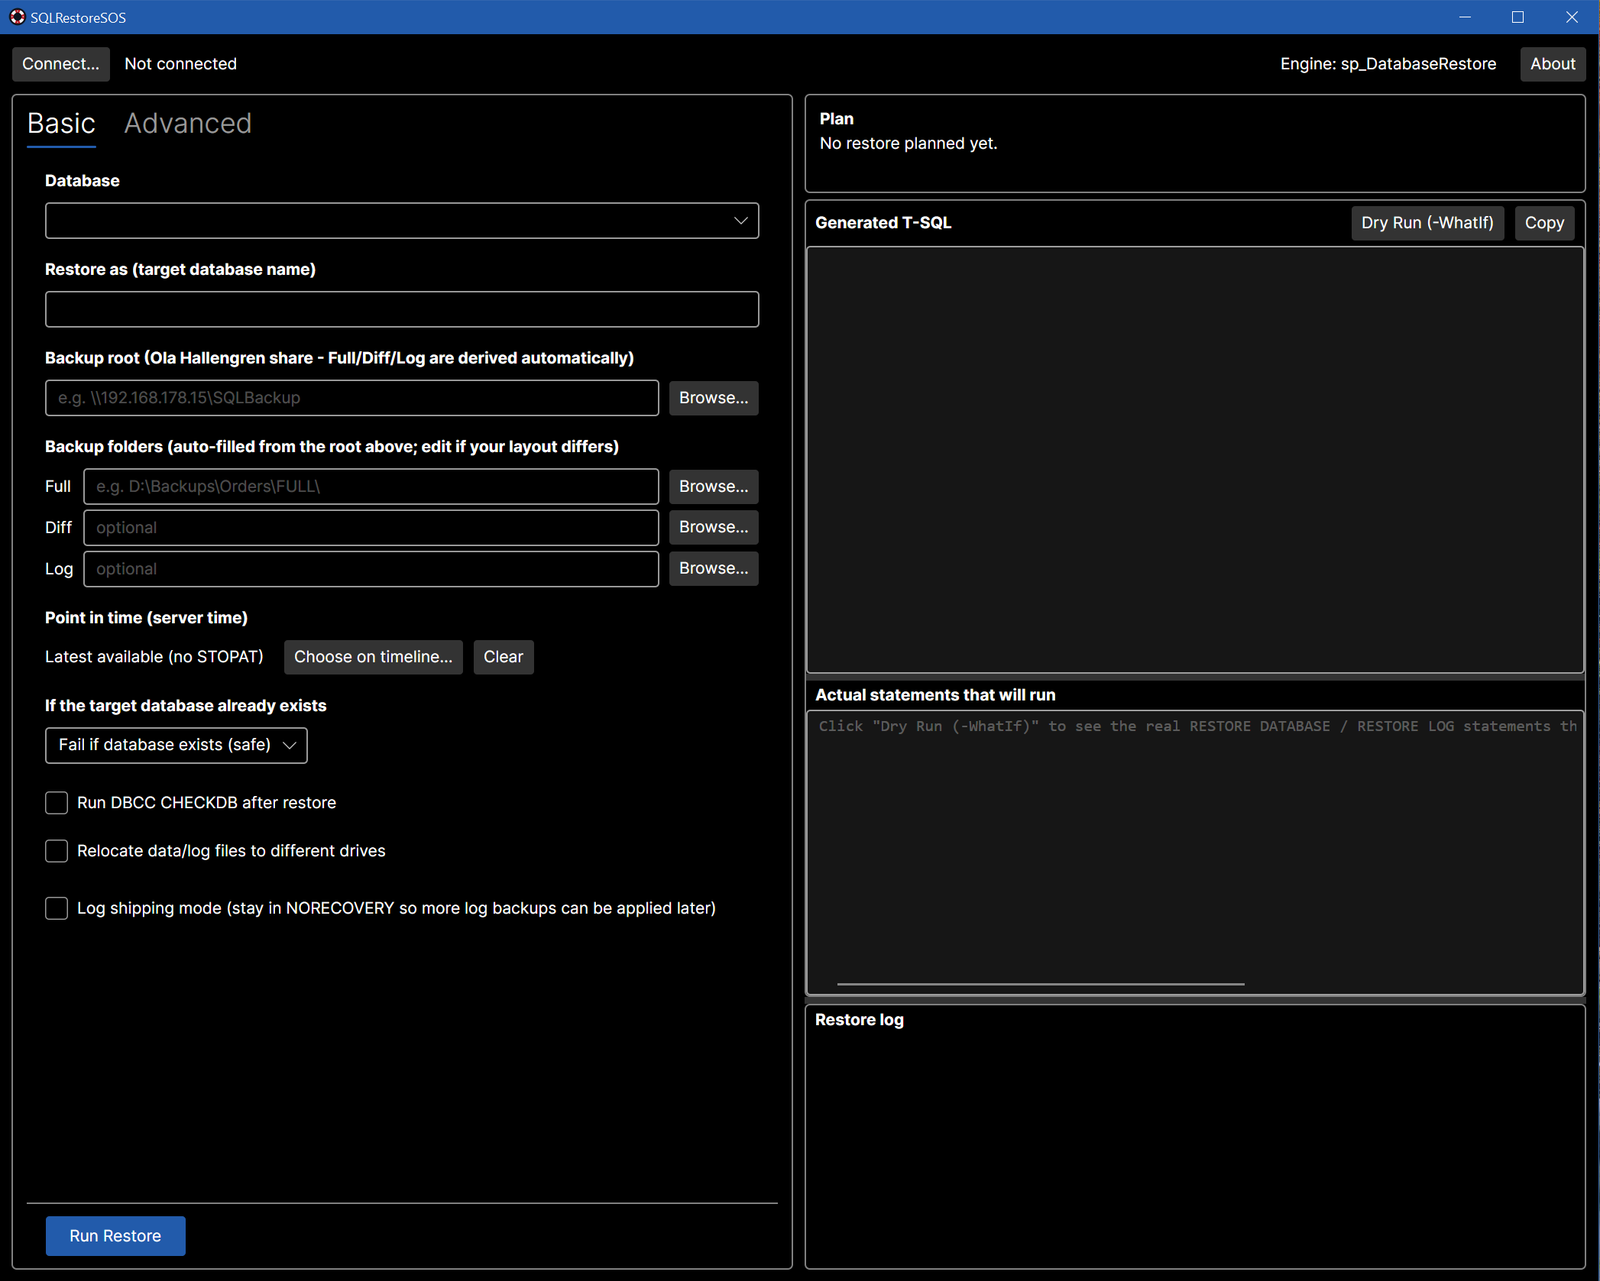
Scenario 1: Restore the full chain
The “everything is gone” case. You want the database back as of the latest backup.
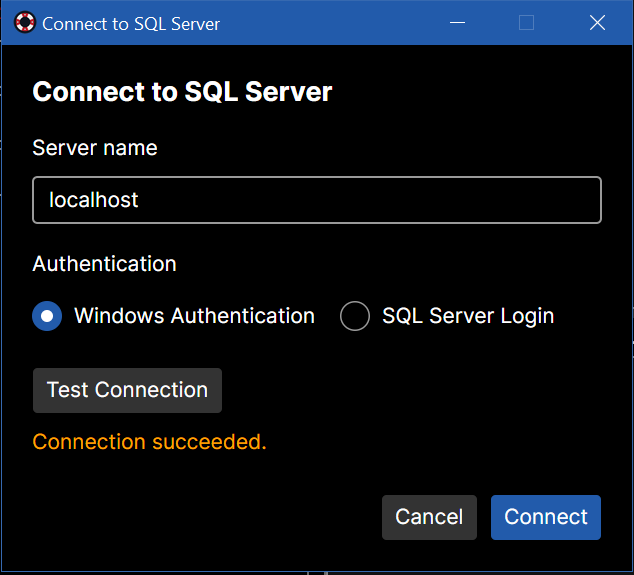
- Click Connect… and choose your instance.
- Pick the Database. The app suggests a target name with a timestamp, so you restore next to the original instead of over it. That is exactly what you want when only one table is lost: production keeps running while you work.
- Enter the backup root, for example
\\fileserver\SQLBackup\SERVER\MyDb. If you use Ola Hallengren’s backup solution, theFULL,DIFFandLOGfolders are filled in for you. - Leave Point in time at Latest available.
- Click Run Restore. The button is pinned at the bottom of the window, so it is always where you expect it.
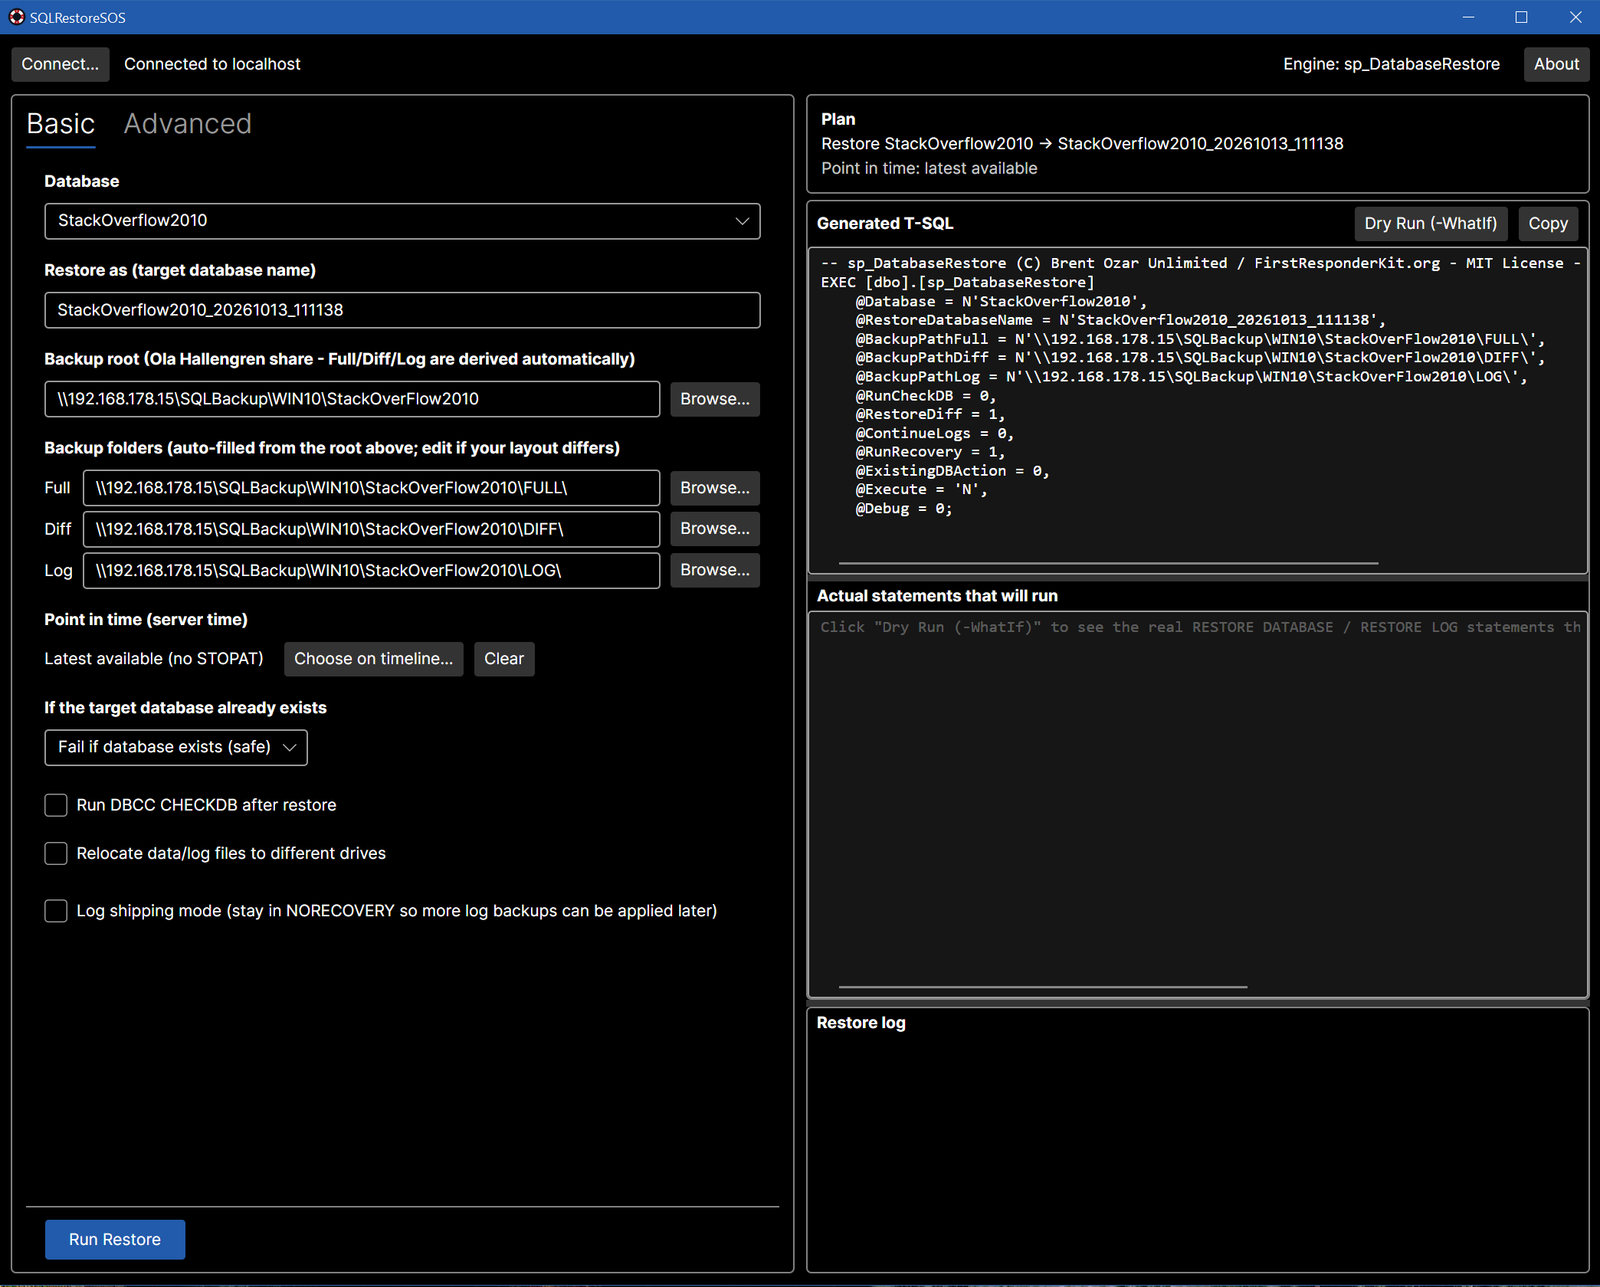
That is the whole job. The generated call looks like this:
-- sp_DatabaseRestore (C) Brent Ozar Unlimited / FirstResponderKit.org - MIT License
EXEC [dbo].[sp_DatabaseRestore]
    @Database = N'StackOverflow2010',
    @RestoreDatabaseName = N'StackOverflow2010_20261013_111138',
    @BackupPathFull = N'\\fileserver\SQLBackup\WIN10\StackOverFlow2010\FULL\',
    @BackupPathDiff = N'\\fileserver\SQLBackup\WIN10\StackOverFlow2010\DIFF\',
    @BackupPathLog  = N'\\fileserver\SQLBackup\WIN10\StackOverFlow2010\LOG\',
    @RestoreDiff = 1,
    @ContinueLogs = 0,
    @RunRecovery = 1,
    @ExistingDBAction = 0,
    @Execute = 'Y';
The procedure picks the newest full, the newest matching differential, and every log after that, and finishes with WITH RECOVERY.
Look before you leap: Dry Run
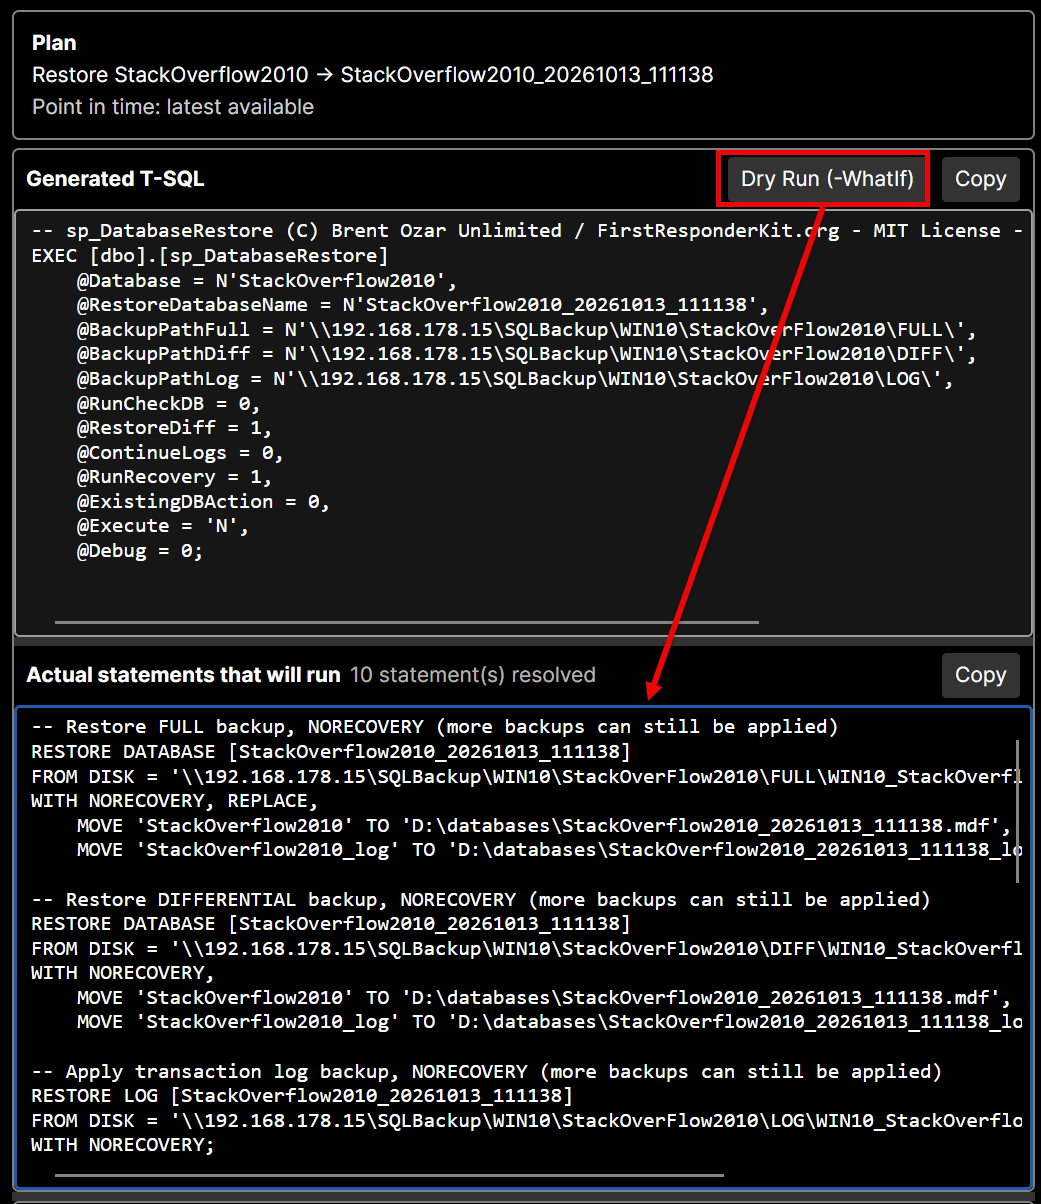
That call is short, but the procedure expands it into many statements. Click Dry Run (-WhatIf) and the app asks the procedure to list the real RESTORE commands without running them. Here the chain is one full, one differential and several logs, each with a plain-language comment.
Prefer SSMS? Copy it there
You do not have to run anything from the app. Copy puts the resolved script on the clipboard. Paste it into SSMS, read it, and run it there if that is how your team works. Every statement ends in a semicolon, and the last one brings the database online.
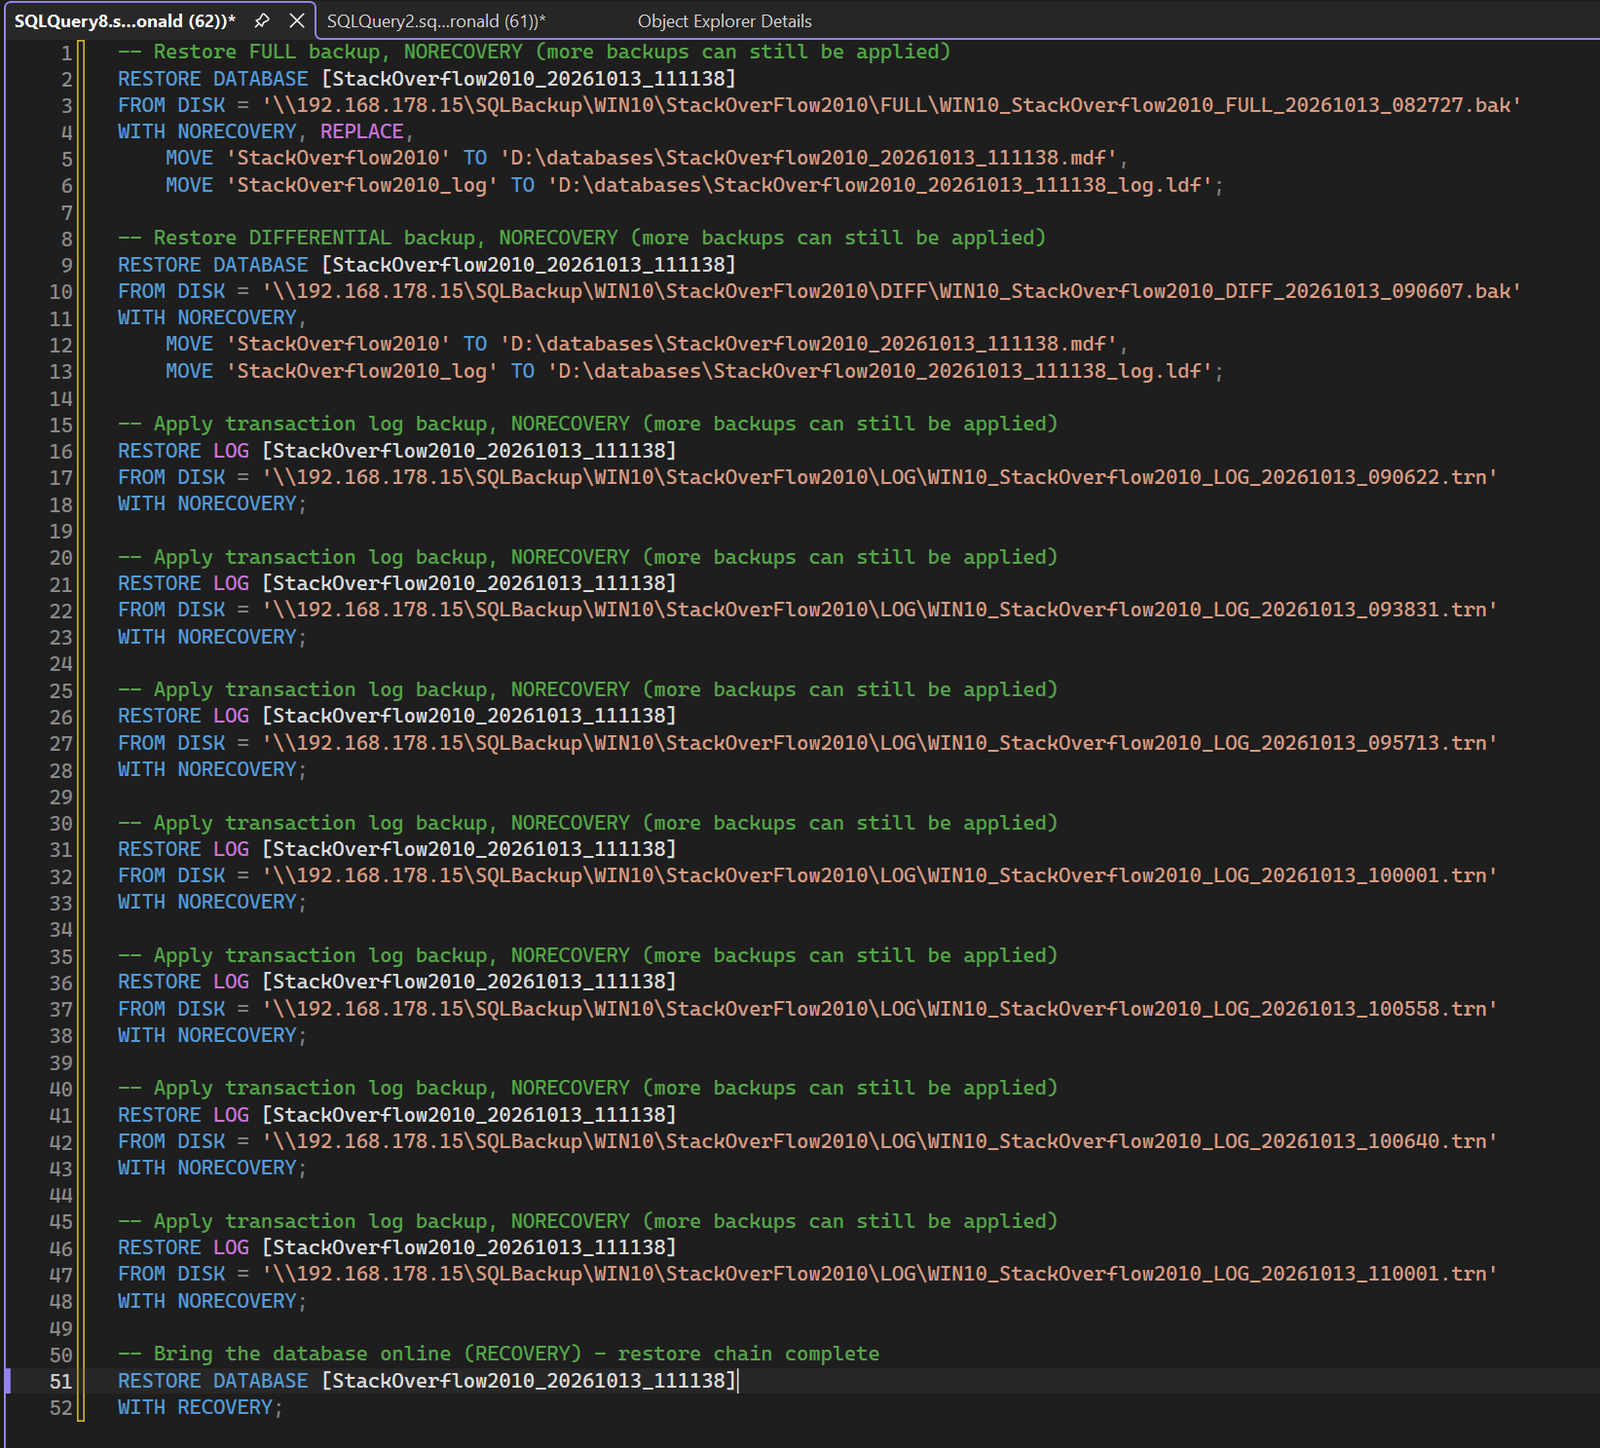
WITH RECOVERY.Run it
Click Run Restore and watch the Restore log. It streams what the server reports, statement by statement, and ends with Restore completed.
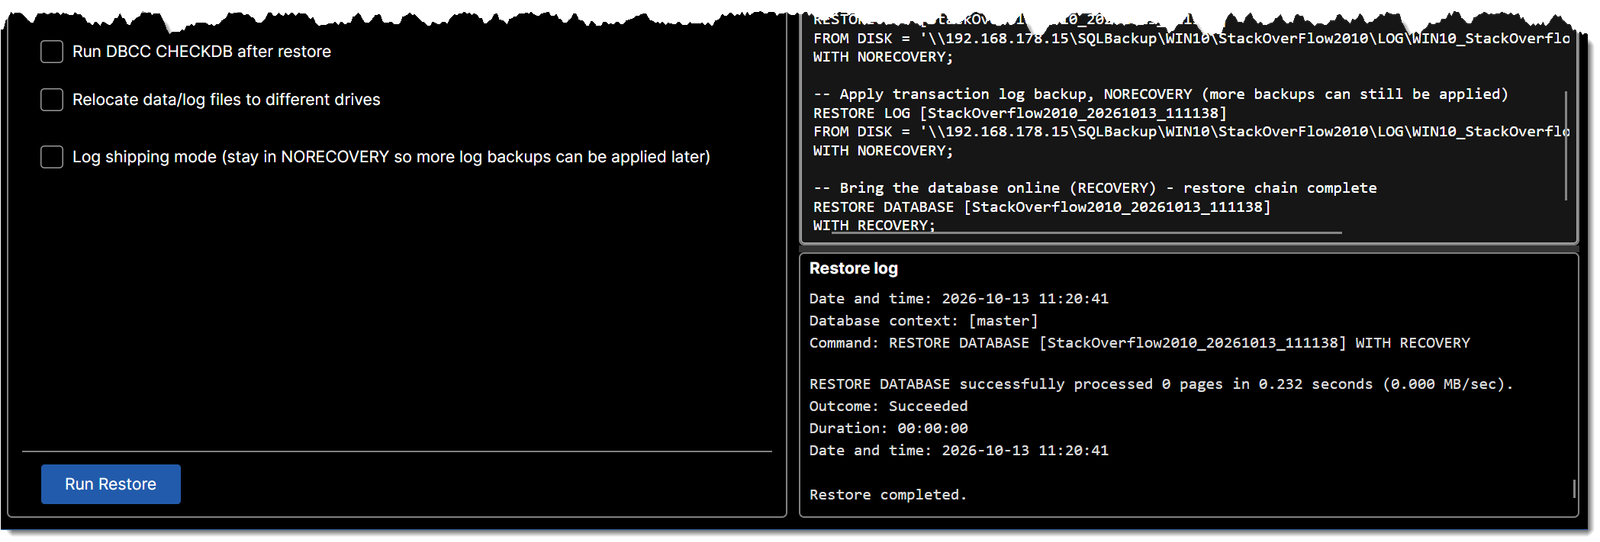
WITH RECOVERY.Scenario 2: Stop at an exact time (easy, easy!)
This is the one that saves careers. The table was dropped at about 09:44, so you want the database as it was a moment earlier. Ask the developer for the time and then go a little before it. A restore to “latest” would contain the drop, and you would be back where you started.
Under Point in time, click Choose on timeline…. The app scans your backup folders and opens a large dialog with every backup in the order it was made.
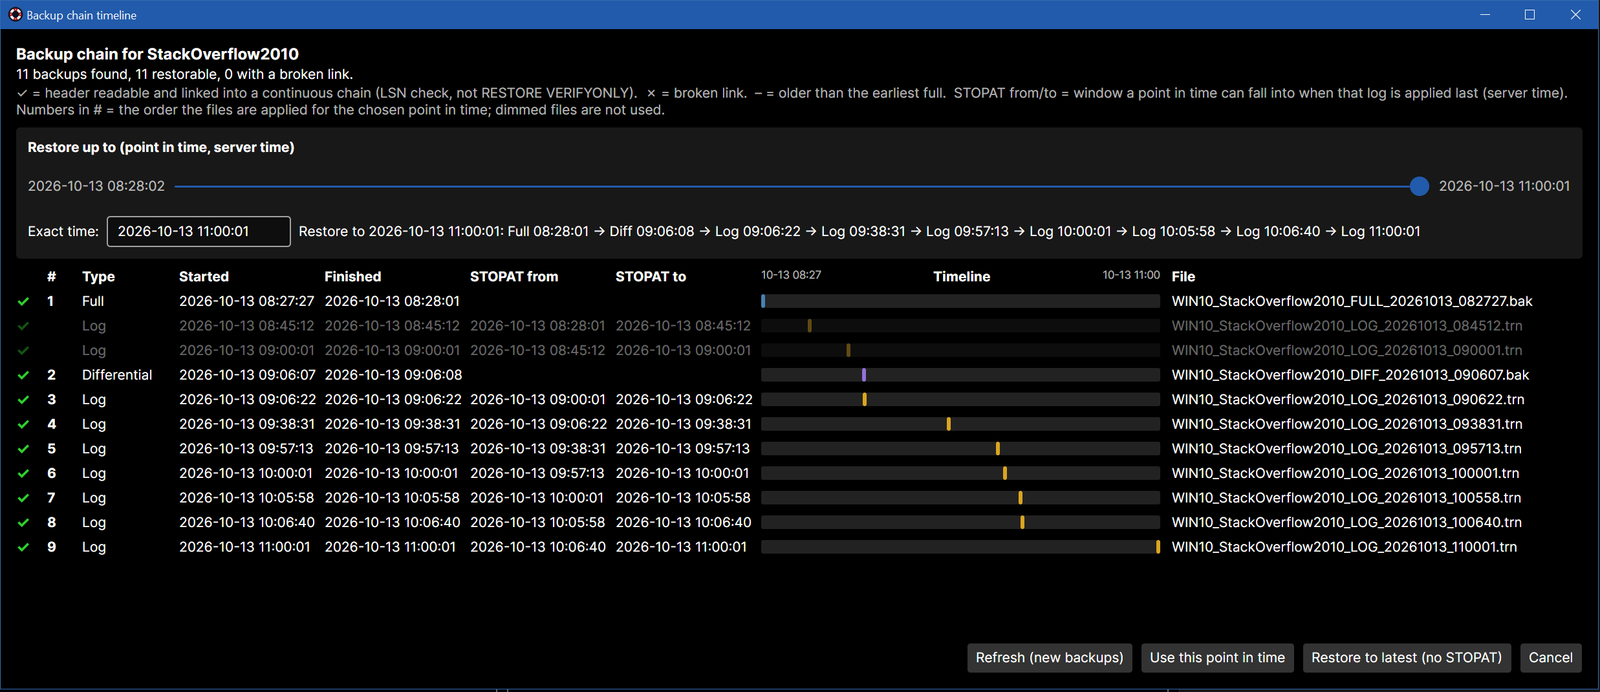
Each row tells you what you need to know:
- ✓
- The backup header is readable and it links into a continuous chain. This is an LSN check, not
RESTORE VERIFYONLY, so it will not catch a corrupt backup body. - ✗
- A link is missing: a gap in the log chain, or a differential whose full backup is gone.
- –
- Readable, but older than the earliest full, so it is not part of any chain.
- STOPAT from / to
- For each log backup, the window a point in time can fall into when that log is the last one applied.
Now drag the slider, or type the time in the exact time box. As you move it, the files that will be used are numbered 1, 2, 3… in the order they are applied, and the rest are dimmed. At 09:43:48 the plan is the full, the differential and three logs:
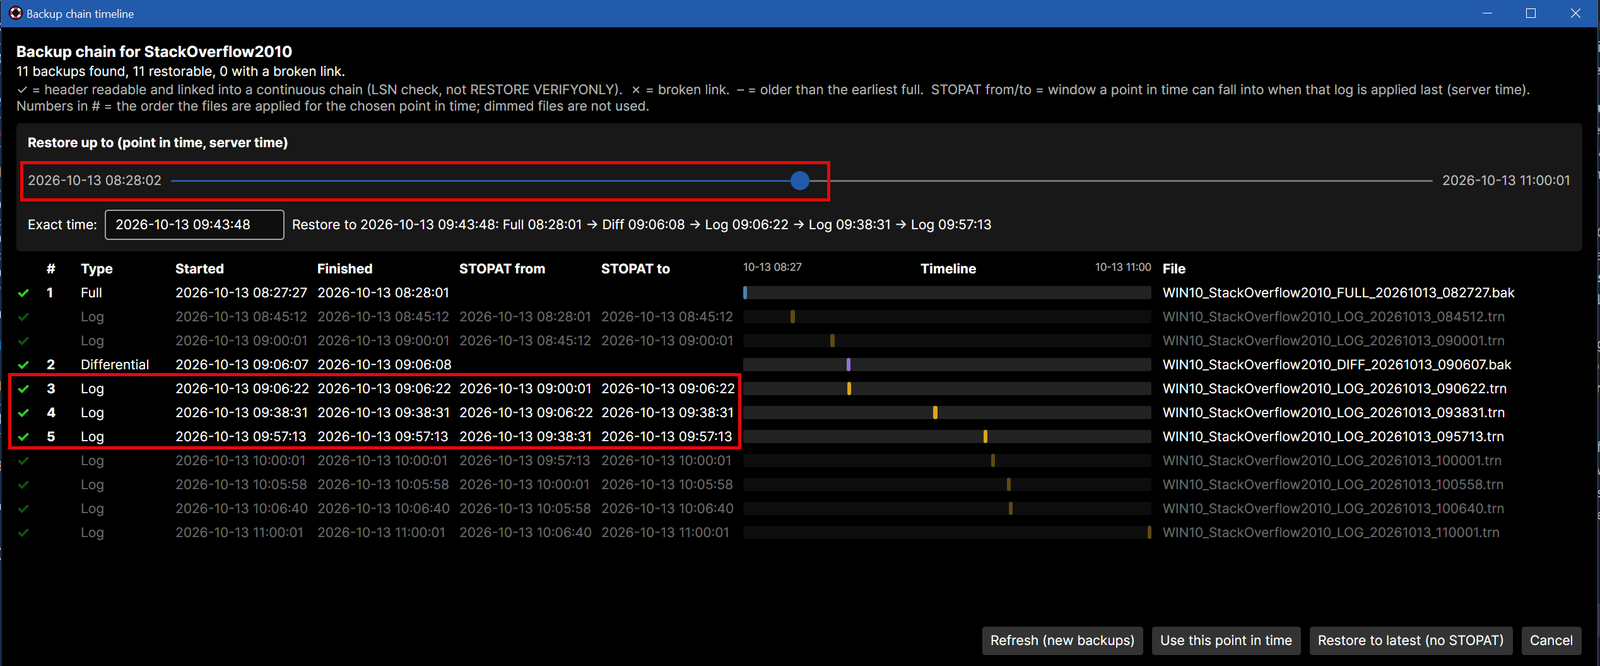
Click Use this point in time and the generated call gains one line:
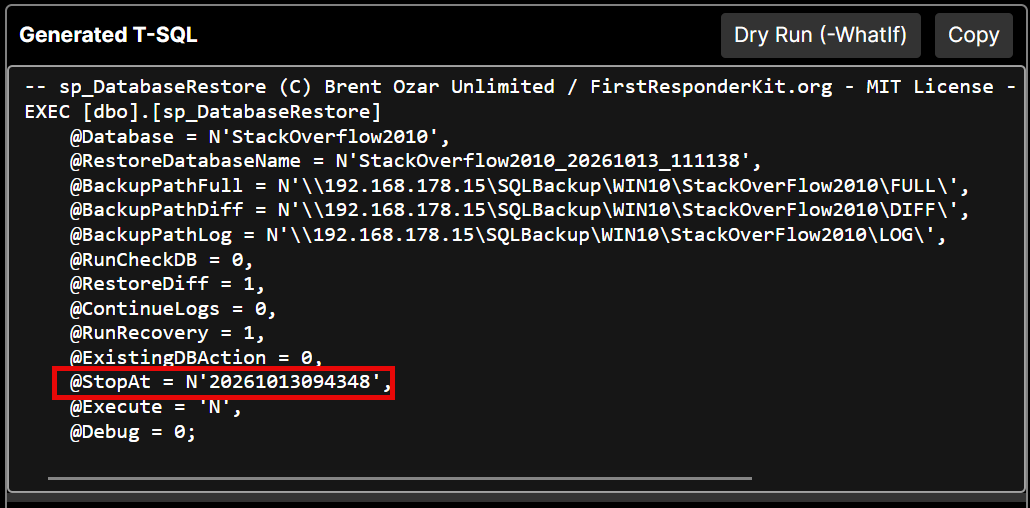
@StopAt = N'20261013094348', the yyyyMMddHHmmss format you would otherwise have to type by hand.The resolved statements show the same time on each log restore, and SQL Server confirms where it stopped:
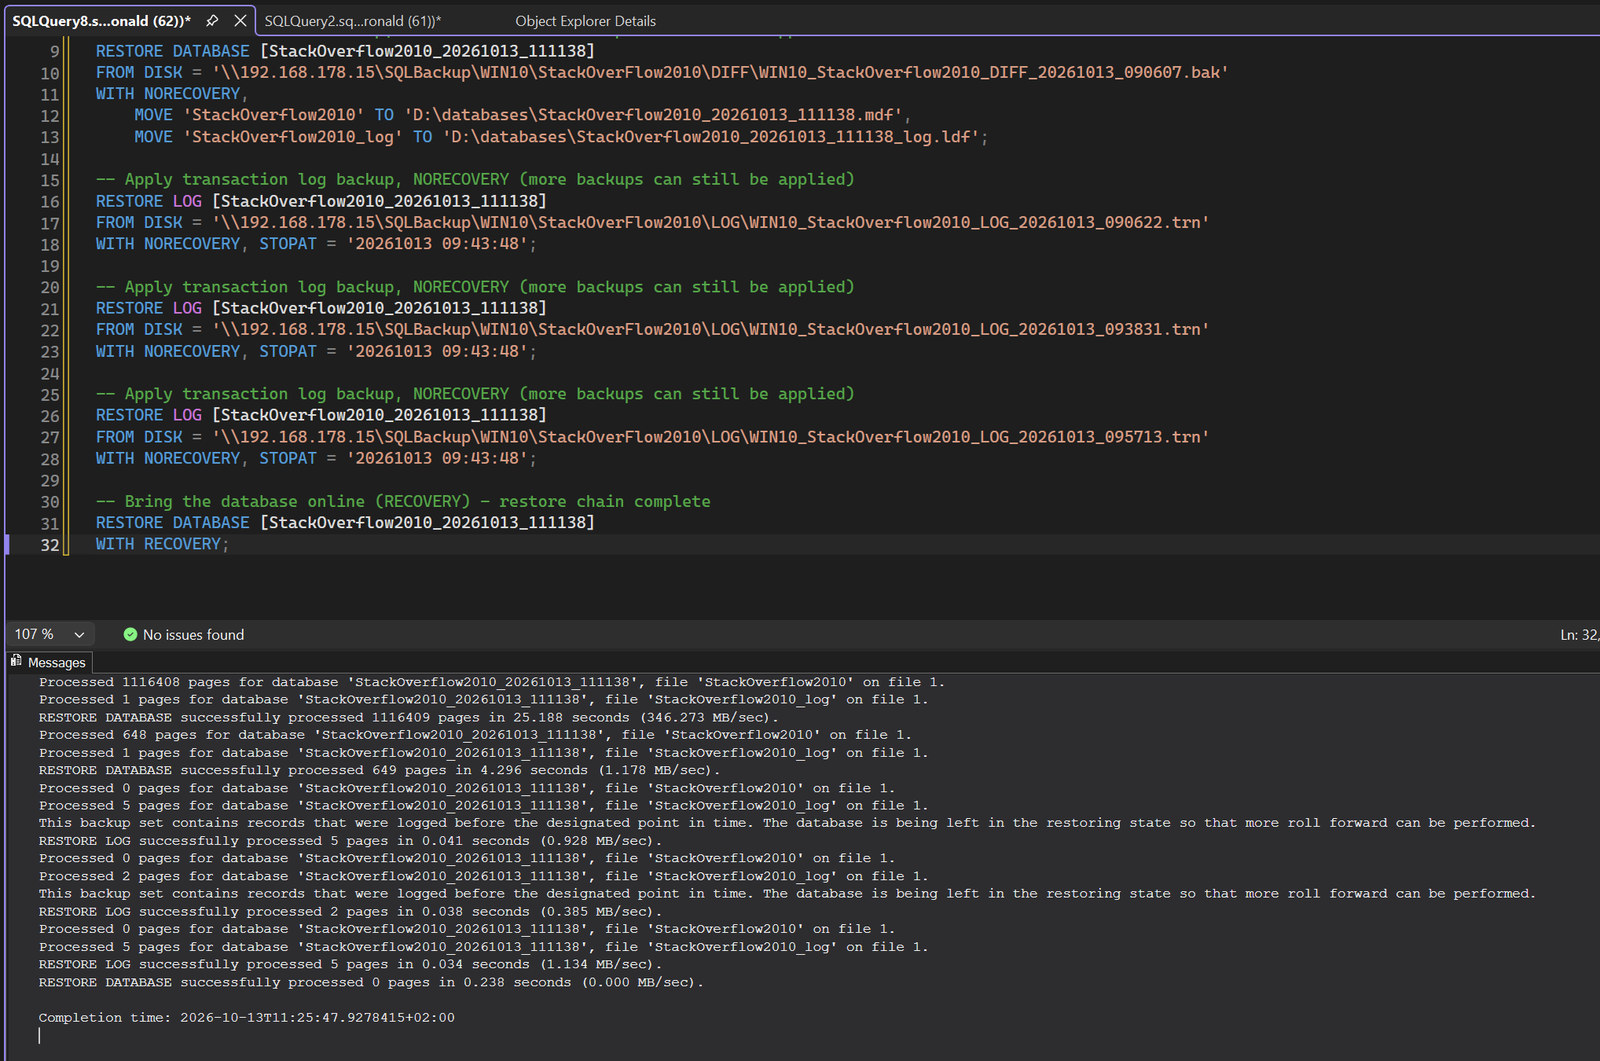
WITH NORECOVERY, STOPAT = '20261013 09:43:48', then WITH RECOVERY opens the database.The slider cannot start too early. Its left end is one second after the earliest full backup finished. A STOPAT before that is what makes SQL Server answer “The specified STOPAT time is too early” (Msg 4335) after you have already waited for the full to restore. The dialog shows a red message instead.
New backups arrive while you are thinking? Refresh (new backups) rescans the folders and keeps your chosen time.
Now get the table back
Click Run Restore. When it finishes you have a second database next to production, for example StackOverflow2010_20261013_111138, containing the table as it was at the chosen time. Production was never touched.
The last step is a normal piece of T-SQL. The quickest way is to copy the table across:
-- Recreates the table with its data (no indexes, keys or defaults)
SELECT *
INTO   [StackOverflow2010].[dbo].[Badges]
FROM   [StackOverflow2010_20261013_111138].[dbo].[Badges];
If the table has a primary key, indexes or constraints, script the table from the restored copy first (in SSMS: right-click the table, Script Table as, CREATE To), run that on production, and then fill it:
INSERT INTO [StackOverflow2010].[dbo].[Badges] (Id, Name, UserId, Date)
SELECT Id, Name, UserId, Date
FROM   [StackOverflow2010_20261013_111138].[dbo].[Badges];
Check the row count, tell the developer, and drop the restored copy when you are done. If rows were added to that table between the chosen time and the drop, those few are lost. That is the price of a point in time, and it is the reason to pick the time carefully.
Resist the urge to restore over production. It is the most dangerous option in the list, it takes everything else that happened since that moment with it, and the app makes you tick a confirmation box before it will do it.
Scenario 3: Log shipping, without the scripts
Sometimes you do not want the database online yet. You want a copy that stays in NORECOVERY and keeps catching up as new log backups land: a warm standby, or a migration where you cut over at a planned moment.
1. Switch on log shipping mode
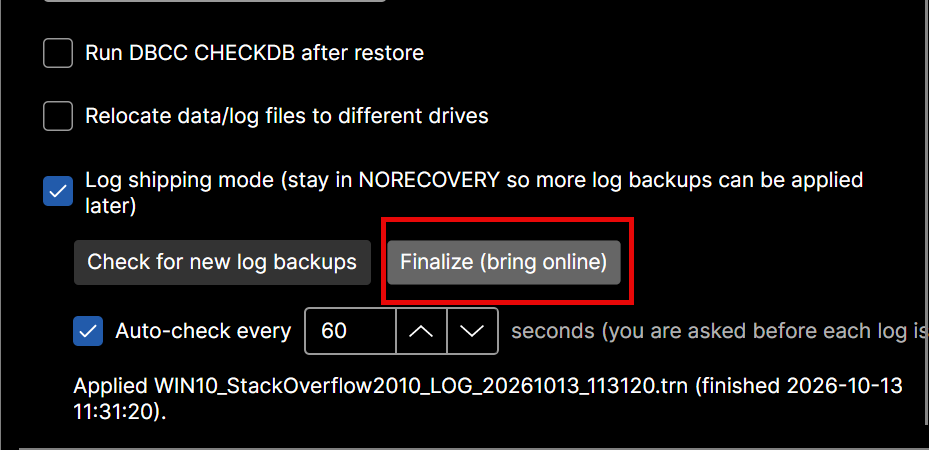
Tick Log shipping mode. Look at the generated call: @RunRecovery = 0. The restore will stay in NORECOVERY so more logs can be applied later.
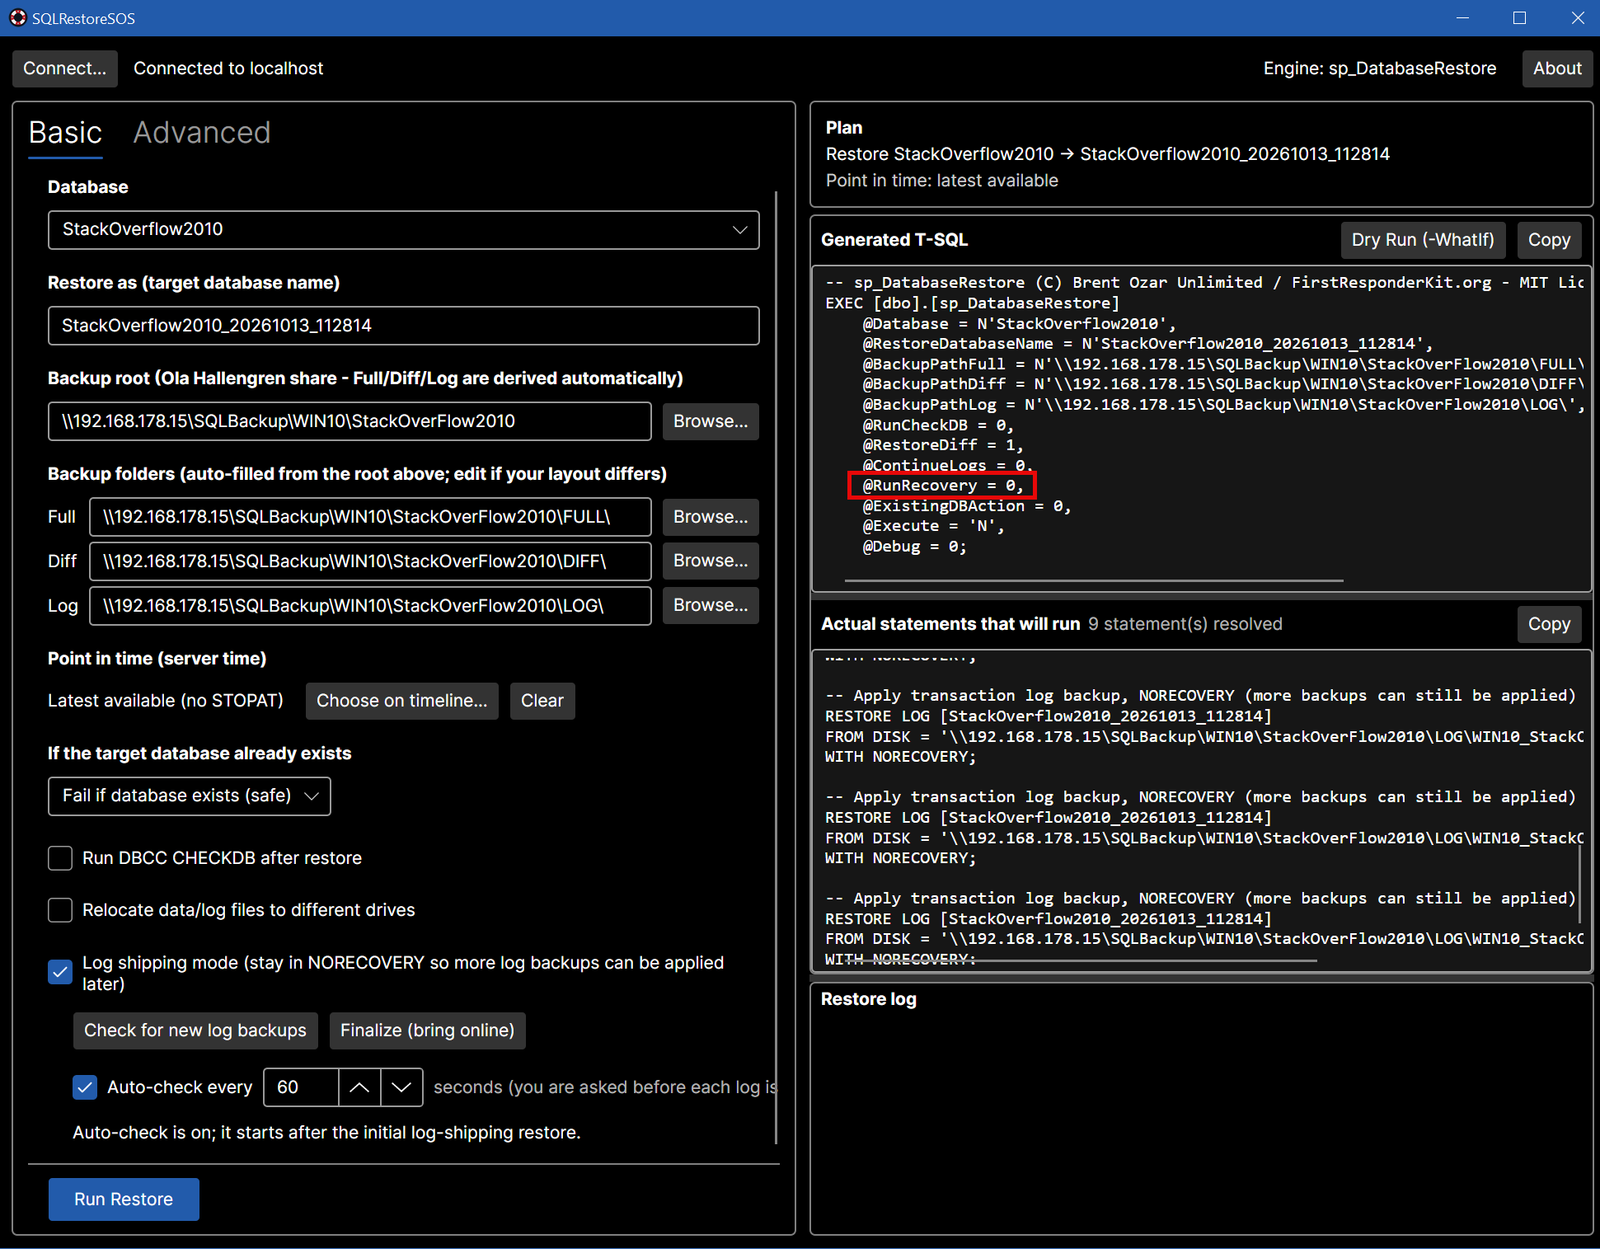
@RunRecovery = 0 is highlighted; the new buttons and the auto-check interval appear under the checkbox.2. Run the initial restore
Click Run Restore as in scenario 1. When it finishes, the database is not online. In SSMS it shows (Restoring…), which is exactly what you want.

3. Let it watch, and say yes or no
Tick Auto-check every [N] seconds (10 to 3600). The app watches the log folder. When a new log backup shows up you get a dialog with its name and time. Apply restores it and stays in NORECOVERY. Skip pauses the checking, because a later log cannot be applied without the one you skipped.
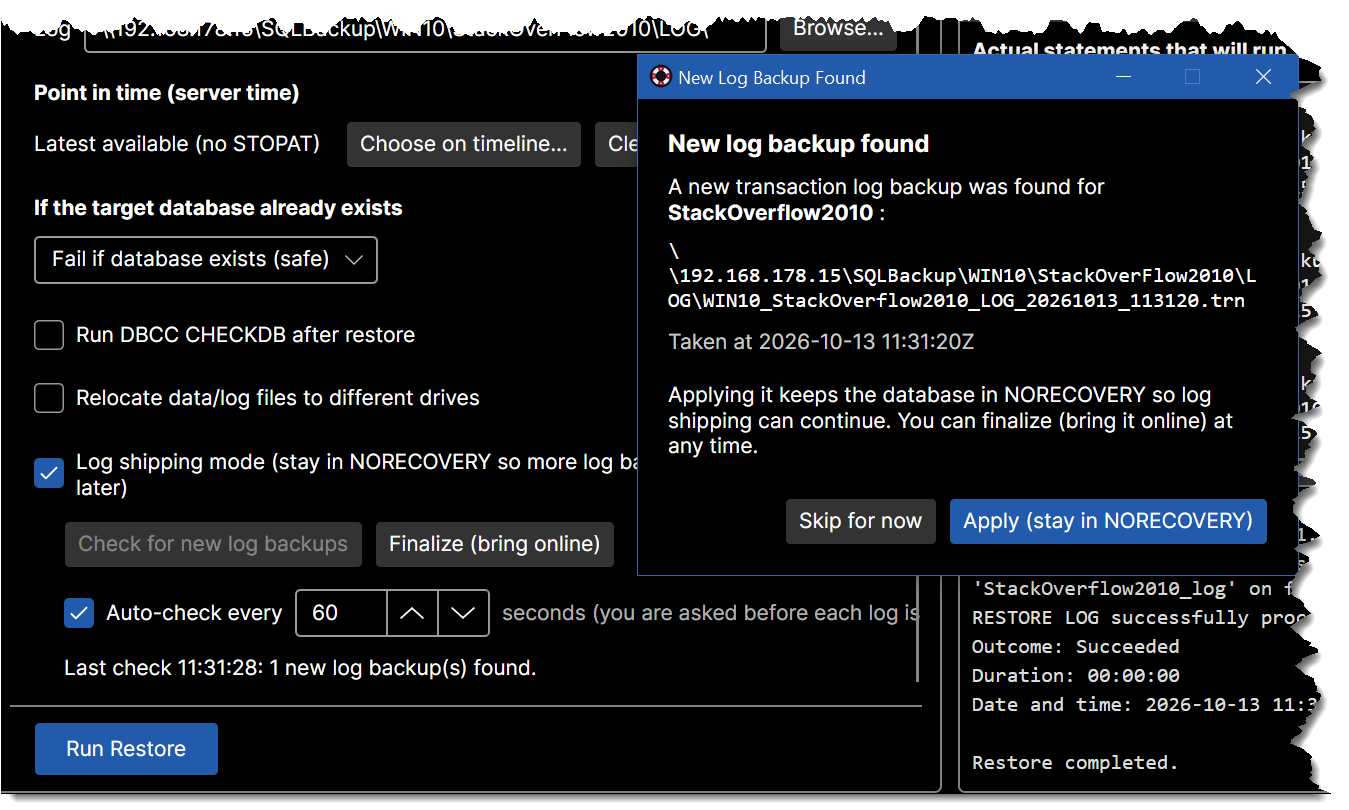
NORECOVERY; Skip pauses the watching.I deliberately did not make it apply logs automatically. For a junior DBA, a confirmation per log is a feature: you always know the state of the database. The status line under the buttons says when it last checked and what it applied.
4. Finalize on cutover day
When it is time, click Finalize (bring online). That is the single RESTORE DATABASE ... WITH RECOVERY that opens the database.
Behind this, the app uses exactly the pattern from sp_DatabaseRestore’s own help: first @ContinueLogs = 0, @RunRecovery = 0, then @ContinueLogs = 1, @RunRecovery = 0 for each log, and @RunRecovery = 1 at the end. You do not have to remember which is which.
Advanced options
The simple tab covers most incidents. When you need the rest of the procedure, the Advanced tab exposes its parameters, grouped by what they do. Change a value and the generated T-SQL updates immediately.
| Group | What it controls |
|---|---|
| Source & target | Source database, restored name, owner, and what to do if the target already exists. |
| Backup locations | Full / Diff / Log folders, file name prefix, custom extensions, skip backups already in msdb. |
| Point in time & chain | StopAt, only logs after a time, restore the differential, continue an existing restore. |
| File placement | Move data, log, FILESTREAM and full-text files to other drives. |
| Recovery behavior | Run recovery or not, STANDBY with an undo file, force SIMPLE recovery, TRUSTWORTHY, fix orphan users, keep CDC, enable Service Broker. |
Dry Run (-WhatIf)
The Dry Run button connects to the server and asks the procedure to resolve the real statements without executing them. You see the actual RESTORE DATABASE and RESTORE LOG commands, one per file, each with a short comment:
-- Restore FULL backup, NORECOVERY (more backups can still be applied)
RESTORE DATABASE [StackOverflow2010_20261013_111138]
FROM DISK = '\\fileserver\...\FULL\WIN10_StackOverflow2010_FULL_20261013_082727.bak'
WITH NORECOVERY, REPLACE,
    MOVE 'StackOverflow2010' TO 'D:\databases\StackOverflow2010_20261013_111138.mdf',
    MOVE 'StackOverflow2010_log' TO 'D:\databases\StackOverflow2010_20261013_111138_log.ldf';

-- Apply transaction log backup, NORECOVERY (more backups can still be applied)
RESTORE LOG [StackOverflow2010_20261013_111138]
FROM DISK = '\\fileserver\...\LOG\WIN10_StackOverflow2010_LOG_20261013_090622.trn'
WITH NORECOVERY;

-- Bring the database online (RECOVERY) - restore chain complete
RESTORE DATABASE [StackOverflow2010_20261013_111138]
WITH RECOVERY;
A good habit for juniors: run the dry run, read it top to bottom, and only then click Run Restore.
Overwriting an existing database
The default is the safe one: fail if the database exists. Kill connections, take offline and drop are all available, and every one of them stops at a confirmation dialog that you must tick before the button becomes clickable.
Everything is resizable
Generated T-SQL, the resolved statements and the restore log each have a splitter, so you can make the pane you are reading as large as you like.
What you need before you start
sp_DatabaseRestoreinstalled on the instance. The script is bundled with the app under its MIT license.- Ola Hallengren’s
CommandExecuteinmaster.sp_DatabaseRestoredepends on it. - The SQL Server service account needs read access to the backup share, because all discovery and restoring happens on the server.
- Windows only, by design.
Get it
sp_DatabaseRestore.SQLRestoreSOS is open source: github.com/ronaldgithub/SQLRestoreSOS. Build it with the .NET 8 SDK (dotnet run --project src\SQLRestoreSOS.App), try it on a test instance first, and tell me what a junior DBA stumbles over. That is the part I want to keep improving.
sp_DatabaseRestore is © Brent Ozar Unlimited / FirstResponderKit.org, MIT license. Ola Hallengren’s CommandExecute is part of the SQL Server Maintenance Solution. SQLRestoreSOS only calls these; it does not change them.